
declare (strict_types=1); namespace ElementorProDeps\DI; use ElementorProDeps\DI\Definition\ArrayDefinitionExtension; use ElementorProDeps\DI\Definition\EnvironmentVariableDefinition; use ElementorProDeps\DI\Definition\Helper\AutowireDefinitionHelper; use ElementorProDeps\DI\Definition\Helper\CreateDefinitionHelper; use ElementorProDeps\DI\Definition\Helper\FactoryDefinitionHelper; use ElementorProDeps\DI\Definition\Reference; use ElementorProDeps\DI\Definition\StringDefinition; use ElementorProDeps\DI\Definition\ValueDefinition; if (!\function_exists('ElementorProDeps\\DI\\value')) { /** * Helper for defining a value. * * @param mixed $value */ function value($value) : ValueDefinition { return new ValueDefinition($value); } } if (!\function_exists('ElementorProDeps\\DI\\create')) { /** * Helper for defining an object. * * @param string|null $className Class name of the object. * If null, the name of the entry (in the container) will be used as class name. */ function create(string $className = null) : CreateDefinitionHelper { return new CreateDefinitionHelper($className); } } if (!\function_exists('ElementorProDeps\\DI\\autowire')) { /** * Helper for autowiring an object. * * @param string|null $className Class name of the object. * If null, the name of the entry (in the container) will be used as class name. */ function autowire(string $className = null) : AutowireDefinitionHelper { return new AutowireDefinitionHelper($className); } } if (!\function_exists('ElementorProDeps\\DI\\factory')) { /** * Helper for defining a container entry using a factory function/callable. * * @param callable $factory The factory is a callable that takes the container as parameter * and returns the value to register in the container. */ function factory($factory) : FactoryDefinitionHelper { return new FactoryDefinitionHelper($factory); } } if (!\function_exists('ElementorProDeps\\DI\\decorate')) { /** * Decorate the previous definition using a callable. * * Example: * * 'foo' => decorate(function ($foo, $container) { * return new CachedFoo($foo, $container->get('cache')); * }) * * @param callable $callable The callable takes the decorated object as first parameter and * the container as second. */ function decorate($callable) : FactoryDefinitionHelper { return new FactoryDefinitionHelper($callable, \true); } } if (!\function_exists('ElementorProDeps\\DI\\get')) { /** * Helper for referencing another container entry in an object definition. */ function get(string $entryName) : Reference { return new Reference($entryName); } } if (!\function_exists('ElementorProDeps\\DI\\env')) { /** * Helper for referencing environment variables. * * @param string $variableName The name of the environment variable. * @param mixed $defaultValue The default value to be used if the environment variable is not defined. */ function env(string $variableName, $defaultValue = null) : EnvironmentVariableDefinition { // Only mark as optional if the default value was *explicitly* provided. $isOptional = 2 === \func_num_args(); return new EnvironmentVariableDefinition($variableName, $isOptional, $defaultValue); } } if (!\function_exists('ElementorProDeps\\DI\\add')) { /** * Helper for extending another definition. * * Example: * * 'log.backends' => DI\add(DI\get('My\Custom\LogBackend')) * * or: * * 'log.backends' => DI\add([ * DI\get('My\Custom\LogBackend') * ]) * * @param mixed|array $values A value or an array of values to add to the array. * * @since 5.0 */ function add($values) : ArrayDefinitionExtension { if (!\is_array($values)) { $values = [$values]; } return new ArrayDefinitionExtension($values); } } if (!\function_exists('ElementorProDeps\\DI\\string')) { /** * Helper for concatenating strings. * * Example: * * 'log.filename' => DI\string('{app.path}/app.log') * * @param string $expression A string expression. Use the `{}` placeholders to reference other container entries. * * @since 5.0 */ function string(string $expression) : StringDefinition { return new StringDefinition($expression); } } Easy Steps to Exness Open Account for Successful Trading - کلبه پزشک

Easy Steps to Exness Open Account for Successful Trading

exness2
📋 فهرست مطالب
  1. در حال بارگذاری...
Easy Steps to Exness Open Account for Successful Trading

Opening an Exness Account: A Comprehensive Guide

If you’re looking to dive into the world of online trading, know that opening an account with Exness is a straightforward process. exness open account Exness South Africa provides additional resources for South African traders. With a user-friendly interface and a range of trading options, Exness has become a popular choice among traders. This article will guide you through the steps necessary to open an Exness account, the various types of accounts available, and tips to make your trading experience as successful as possible.

Why Choose Exness?
Easy Steps to Exness Open Account for Successful Trading

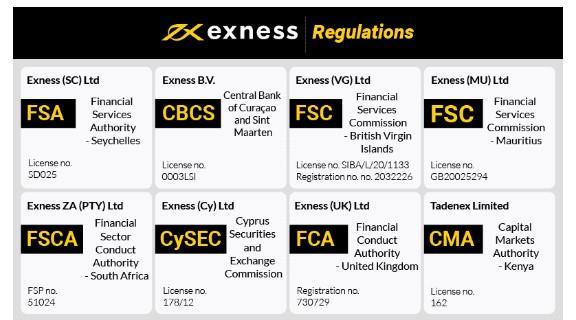
Exness is renowned for its transparent trading conditions, strong regulation, and a diverse range of financial instruments. Established in 2008, the company has built a reputation for reliability and has received numerous awards for its customer service. Whether you’re a novice or an experienced trader, Exness caters to all experience levels with its user-friendly platform and excellent educational resources.

Types of Accounts Available

Before you start the account opening process, it’s crucial to understand the different types of accounts Exness offers:

  • Standard Account: This account type is perfect for beginners. It has no minimum deposit requirement and offers trading on a wide variety of assets.
  • Pro Account: Aimed at more experienced traders, this account type allows for tighter spreads and offers more leverage options.
  • Cent Account: Designed for those who want to practice their trading skills, this account allows you to trade in smaller amounts.
  • ECN Account: Ideal for professional traders, it offers direct market access and better pricing.

Steps to Open Your Exness Account

Follow these simple steps to open your Exness account:

Easy Steps to Exness Open Account for Successful Trading
  1. Visit the Exness Website: Go to the official Exness website and click on the “Open Account” button.
  2. Provide Your Information: Fill in your personal details, including your name, email address, and phone number. Ensure that all information is accurate.
  3. Verification: Verify your identity by uploading the required documents, such as valid identification and proof of address. This step is crucial for maintaining regulatory compliance.
  4. Account Setup: Choose the type of trading account you want to open. You can also set up a demo account for practice if you prefer.
  5. Deposit Funds: Fund your account using one of Exness’s many payment methods such as bank transfer, credit card, or e-wallets. Remember that some account types might have a minimum deposit requirement.
  6. Start Trading: Once your account is funded, you can download the trading platform and start your trading journey!

Tips for a Successful Trading Experience

To maximize your chances of success while trading with Exness, consider the following tips:

  • Educate Yourself: Leverage the educational materials provided by Exness, such as webinars, articles, and tutorials.
  • Develop a Trading Strategy: Establish a clear trading plan that outlines your goals, risk tolerance, and trading style.
  • Practice Risk Management: Use proper risk management techniques to protect your capital, like setting stop-loss orders.
  • Stay Informed: Keep up with market news that can impact your trading decisions. Financial news websites and economic calendars are great resources.

Conclusion

Opening an account with Exness is a seamless process designed to accommodate both novice and experienced traders. By understanding the account types available, following the steps to open your account, and applying good trading practices, you can embark on a promising trading journey. Always remember that trading involves risks, and it’s essential to trade wisely. Happy trading!

← مقاله قبلی
مقاله‌ای وجود ندارد
مقاله بعدی →
مقاله‌ای وجود ندارد

دیدگاهتان را بنویسید

نشانی ایمیل شما منتشر نخواهد شد. بخش‌های موردنیاز علامت‌گذاری شده‌اند *